Wednesday, December 4, 2019

Gingerbread Layered Cheesecake

Gingerbread Cheesecake

   tastesofLizzyt.com

Thick, rich gingerbread cheesecake layered with gingerbread loaf batter. Spiced whipped topping, crushed ginger snaps top this decadent, holiday dessert!
 Course Dessert
 Cuisine American
 Keywords: christmas cheesecake, easy dessert, gingerbread cake, swirled cheesecake

 Prep Time25 minutes
 Cook Time1 hour 40 minutes
 Total Time2 hours 5 minutes
 Servings14
 Calories526kcal
 AuthorLizzy T

Ingredients

Crust:

  • 34 gingersnap cookies crushed
  • 5 tablespoons butter melted

Cheesecake:

  • 24 ounces cream cheese softened
  • 1 cup white sugar
  • 3 large eggs
  • 1/2 cup plus 1 tablespoon heavy cream
  • 1 teaspoon vanilla

Gingerbread:

  • 1 cup flour
  • 1/2 teaspoon baking soda
  • 3/4 teaspoon ginger
  • 1/2 teaspoon nutmeg
  • 1/4 teaspoon salt
  • 2 tablespoons sugar
  • 1/4 cup molasses
  • 1/4 cup butter softened
  • 1 large egg
  • 1/2 teaspoon vanilla
  • 1/2 cup buttermilk

Topping:

  • 8 ounces Cool Whip
  • 1/2 teaspoon ginger
  • 1/2 teaspoon nutmeg
  • 15 gingersnap cookies crushed
  • Caramel ice cream topping optional

Instructions

  • Spray a 10 1/4" springform pan with cooking spray. Wrap the sides and bottom of the pan in two layers of aluminum foil.
  • In a small bowl, mix together the gingersnaps and butter for the crust. Press these crumbs into the bottom of the springform pan. Set aside.
  • For the cheesecake: In a stand mixer bowl, beat together the cream cheese and sugar at medium speed until completely smooth, which will be about 2 minutes. Add the eggs one at a time, beating for 30 seconds or so after each egg. Scrape down the sides of the bowl as needed. Add the heavy cream and vanilla extract and beat just until mixed.
  • For the gingerbread batter: In a mixing bowl, thoroughly stir together the flour, baking soda, ginger, nutmet and salt. Set aside. In a large mixing bowl, beat together the sugar, molasses, butter, eggs and vanilla until light and fluffy. Add the flour mixture to the sugar mixture alternately with the buttermilk, stirring just until blended after each addition.
  • Pour half of the cheesecake batter over top the gingersnap crust. Spoon spoonfuls of gingerbread batter over the cheesecake batter. Then alternate spoonfuls of cheesecake batter and gingerbread batter, leaving enough cheesecake batter to cover most of the top of the cake. I had just a little bit of gingerbread batter showing on top. The pan will be very full.
  • Place the springform pan into a larger pan. Boil 1-2 quarts of water. Pour the boiling water into the larger pan until the water comes about halfway up the side of the foil covered springform pan.

Cheesecake

  • Place the cheesecake in a oven that has been preheated to 325 degrees. Bake the cheesecake for 70-80 minutes. Then turn off the oven and allow the cheesecake to sit inside the oven for another 20-25 minutes, until there is no more than a 2" jiggly spot in the center of the cheesecake. Ovens may vary and pan size will vary, so watch your cheesecake carefully, but to prevent cracks, limit how much you open the oven.
  • Take out the cheesecake. Remove the pan from the water bath and place the pan on a wire rack with a towel placed underneath to catch any drips.
  • Cool the cheesecake for 1 hour, then cover the cheesecake and place it in the refrigerator for at least 6 hours, but preferrably overnight.
  • Before serving, mix the ginger and nutmeg into the Cool Whip and spread the topping over the cheesecake. Sprinkle crushed gingersnaps on top of the Cool Whip.
  • Drizzle with caramel if desired.
  • Store in the refrigerator.

Nutrition

Calories: 526kcal | Carbohydrates: 53g | Protein: 7g | Fat: 32g | Saturated Fat: 17g | Cholesterol: 141mg | Sodium: 470mg | Potassium: 304mg | Sugar: 30g | Vitamin A: 1125IU | Calcium: 123mg | Iron: 2.7mg

Monday, December 2, 2019

Honey Whole wheat Bread

4 cups hot water
1/2 cup honey
1/2 refined coconut oil, warmed in microwave
7 cups fine-ground Whole wheat flour
2 Tbsp yeast
2 Tbsp vinegar

Mix in Bosch with dough hook.
Let rest covered for 30-60 min. Mix occasionally to avoid dough explosion. 

1 Tbsp + 1 tsp natural sea salt
1/2c - 2cups high-gluten bread flour

Mix in Bosch until dough reaches correct consistency. 


Thursday, November 7, 2019

Ultimate Green Bean Casserole

The BEST green bean casserole.  EVER.

Prep Time15 mins
Cook Time45 mins
Total Time1 hr
Course: Side Dish
Cuisine: American
 
Servings: 6 servings
 
Calories: 316 kcal
 
Author: Kimberly Killebrew

Ingredients

  • 3 slices thick-cut bacon, finely diced
  • 1/2 cup finely chopped yellow onion
  • 2 cloves garlic minced
  • 12 ounces fresh button or cremini mushrooms chopped
  • 3 tablespoons butter
  • 3 tablespoons         all-purpose flour
  • 1 cup half-and-half
  • 1 cup chicken broth
  • 1/2 cup shredded white cheddar cheese
  • 3/4 teaspoon sea salt
  • 1/4 teaspoon freshly ground black pepper
  • 1 pound fresh green beans trimmed, halved, and blanched (boil 5 minutes, place beans in ice water for a couple of minutes, drain)
  • 1 can French fried onions. Lars' crispy onions on Amazon have no hydrogenated veg oil. 

Instructions

  • Preheat the oven to 350 degrees F.
  • Fry bacon in a large skillet over medium-high heat until crispy. Add the onions and cook until soft and translucent, about 4-5 minutes. Add the mushrooms and garlic and cook for another 4-5 minutes until the mushrooms are soft. Transfer the mixture to a bowl.
  • Melt the butter in the same skillet and whisk in the flour. Once combined, continue whisking for another 2 minutes until the mixture has slightly deepened in color. Add the half-and-half and chicken broth while constantly whisking to prevent lumps. Once slightly thickened, add the cheese and whisk until melted and combined.
  • Next add the mushroom/bacon mixture along with the salt and pepper. Let the sauce simmer for a couple of minutes, then add the green beans. Stir to combine.
  • Pour the bean mixture into a 9x13 casserole dish and sprinkle the French fried onions all over the top. Bake uncovered for 30 minutes.

Notes

Preparing in Advance: Everything can be done in advance except for adding the crispy onions, otherwise they'll get soggy. Add those just before baking. Also, let the casserole sit for at least 30 minutes after removing it from the fridge before baking.

Calories: 316kcal | Carbohydrates: 14g | Protein: 12g | Fat: 24g | Saturated Fat: 13g | Cholesterol: 62mg | Sodium: 752mg | Potassium: 571mg | Fiber: 2g | Sugar: 4g | Vitamin A: 1035IU | Vitamin C: 13.6mg | Calcium: 232mg | Iron: 1.5mg

Sunday, November 3, 2019

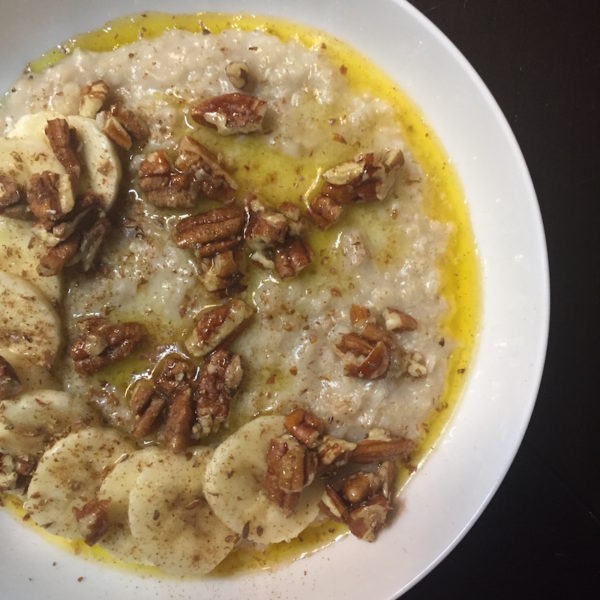
NOURISHING OVERNIGHT OATS WITH CINNAMON, BANANA, AND PECANS


Serves 2
Traditionally prepared, overnight oats topped with healthy fats and crunchy pecans. With a thoughtful soaking session, and the proper ingredients, this porridge-style oatmeal can be a healthful addition to your family table. The combination of salty and sweet reminds me of the hot breakfast cereal I ate growing up.
INGREDIENTS
  1. 1 Cup gluten-free ORGANIC ROLLED OATS
  2. 1 Cup WARM FILTERED WATER
  3. 2 Tablespoons ACID WHEY or 1.5 teaspoons apple cider vinegar (see notes for info and substitutions)
  4. 1/2 teaspoon FINE SEA SALT
  5. 2 Tablespoons of Unsalted GRASS-FED BUTTER (or coconut cream, coconut oil)
  6. 1/2 Cup crushed PECANS
  7. 1 BANANA
  8. CINNAMON
INSTRUCTIONS
  1. Pour 1 cup of OATS in a glass bowl, and stir in 1 cup of warm FILTERED WATER, and 2 Tablespoons of acid WHEY (or 1.5 teaspoons of apple cider vinegar). Cover loosely, and leave overnight in the oven or a cabinet. Allow to soak for at least 7 hours and up to 24 hours.
  2. Optional Step (for changes in flavor): Pour soaked oats into a mesh strainer and rinse with water.
  3. Pour your soaked oats into a non-stick pot, with 1 cup of FILTERED WATER, and 1/2 teaspoon of FINE SEA SALT. Turn heat to high and bring to a boil. Once boiling, COVER and turn heat to LOW to finish cooking for 5 more minutes.
  4. Portion into two bowls (or save some for later, in the refrigerator, for up to a week). Top each portion with 1 Tablespoon of unsalted GRASS-FED BUTTER (or coconut cream/oil), 1/2 sliced banana, 1/4 cup crushed pecans, and plenty of cinnamon. See notes for recommended sweeteners.


NOTES
  1. WHEY: This is the liquid on top of plain, full fat yogurt. Large tubs of yogurt have about 2 Tablespoons of whey floating on top which you can just pour out and use for this recipe. See the info in this post on how to make your own whey and store it for 6 months! You may also use Kefir or Buttermilk, but the nutritional benefits are superior with whey. You can even just use the plain yogurt. A good non-dairy alternative that is also convenient is Lemon Juice or Apple Cider Vinegar, and for these you would use 1.5 teaspoons per cup of water.
  2. SWEETENERS: I think the banana slices are enough for a sweetener. If you need more sweetness, try sprinkling some erythritol, munk fruit sweetener, or xylitol on your oatmeal. We do love the addition of raw honey or maple syrup, but prefer not to use these sugary toppings since the oatmeal is already high in carbohydrates
Recipe from MyLongevityKitchen.com powered by marisamoon.com

Thursday, October 24, 2019

French Apple Pie

Ingredients:

    > one 9 inch pie crust, defrosted

   Filling

> 8 cups of thinly sliced peeled Apples

> ½ cups Sugar

> 1/8 tsp Salt

> 3 tablespoons all-purpose Flour

> ½ teaspoons cinnamon

   Topping

> 1 ⅓ cups of all-purpose flour

> 1 cup brown sugar

> 1 teaspoon cinnamon

> 10 tablespoons cold butter


Directions:

Mix filling ingredients in a large bowl.

Mix topping ingredients in a Bosch with the wire whisk attachment.

Place filling mixture in the pie crust.

Sprinkle topping in an even layer on top of the pie filling.

Bake for about 1 hour at 375 degrees.

Thursday, October 10, 2019

Fermented Raw Sauerkraut with Probiotics


INGREDIENTS and TOOLS NEEDED:

4 lbs cabbage (2 medium/large heads of cabbage) OR 16 to 20 cups loosely-packed cabbage (finely shredded)

6 tsp non-iodized salt, iodine kills the probiotics)

(1.5 tsp salt per 1 lb cabbage OR per 4-5 cups shredded, loosely packed cabbage)

- a 1 lb. weight scale
-Canning funnel
-Clean pint, quart, or two-quart glass Mason jars with rubber gasket lids and rings.  (I choose wide-mouth jars)
-A wooden spoon (not metal) that fits inside the jars

DIRECTIONS:
Lightly rinse cabbage. Remove black spots.  Remove the cores. Save the cores for later.

Finely chop the cabbage.  I like to use the Bosch Universal Plus food processor 'thin slice' attachment to finely chop the cabbage.

Use the weight scale to measure 1 lb cabbage to 1-2 tsp non-iodized salt.

In a large bowl using a wooden spoon or using clean hands, Press and stir salt into the cabbage for quite a few minutes. Do this one pound at a time. You will notice brine juices starting to form.  There is no added water in sauerkraut, only brine juices. Cabbage has more than a dozen naturally occurring probiotics.

Use a canning funnel to place cabbage/salt/brine mixture into mason jars.  Using the top end or bottom end of wooden spoon press cabbage, 3-5 min per pound, into the bottom of the jar to increase brine production and to remove air bubbles.

Keep pressing cabbage to encourage brine production. Fill each jar to the neck abt 1 inch below the very top. I can press the 4 lbs of cabbage into 3 one-quart jars, but the # of jars depends on how finely chopped the cabbagge is. The pressing is successful when the brine is higher than the cabbage, 1/2 inch or more of brine above level of cabbage.

Submerge in brine and all will be fine.

Now it’s time to use the saved core. The core is not to eat but to use as a weight to keep the cabbage below the level of the brine. Chop the core into big chunks/slices.  Place chunks on top of the cabbage until the cabbage is pressed below the brine.  Place enough core chunks to have a little pressure on the lid when the lid is screwed on. Screw lid loose to allow gases to escape.  If the lid is screwed on too tight the juices will explode from the jar leaving leaving a mess around the jar.

Place on the shelf or countertop preferably in an undisturbed place away from direct sunlight.  Cooler room temperatures will slow the lacto-fermentation process. Higher room temperatures will speed the fermentation process. Check it once a week to make sure the brine is still above the level of the cabbage and that there are no off-colors or smells. If brine is below the cabbage and there are no off-colors or smells, Add a little salt water mixture. Let it cure for 2-4 weeks. Taste it at 2 weeks and again at 3 and 4 weeks.  I like its taste at 3-4 weeks. It is ready to eat when you decide which week it's the most tastey.  

Place in the fridge or store in a cool cellar. Sauerkraut lasts more than 6 months in the correct conditions.
Do not cook it. Heat destroys the healthy probiotics that were created by the lacto-fermentation process. 

Raw fermented sauerkraut helps general digestion and has lots of vitamins and minerals including Vitamin C and Vitamin U.  It also includes the activated form of Vitamin K2 which is an essential building block for strong bones. Look up the other health benefits of the amazing superfood, raw sauerkraut, online.

  Enjoy!
~Lindsey
Saturday, September 21, 2019

Best Hamburger Marinade


A delicious hamburger marinade with a smoky, sweet, yet slightly spicy and tangy taste.

PREP TIME5 minutes


COOK TIME8 minutes

TOTAL TIME13 minutes

Ingredients


¼ cup Worcestershire sauce


2 tablespoons red wine vinegar


2 tablespoons brown sugar


2 cloves fresh garlic, minced


1 tablespoon vegetable oil


1 teaspoon onion powder


1 teaspoon black pepper


½ teaspoon salt


½ teaspoon liquid smoke (mesquite flavor)


1 pound ground beef


Instructions


Combine all ingredients except ground beef in a medium bowl. Mix together.


Add ground beef and use your hands to gently blend marinade into meat.


Be careful not to handle too much or meat will become tough.


Form ground beef into four equal sized (1/4 pound) round patties. Flatten patties so they’re bigger than the buns.


Make an indentation in the center of each burger. (This will help burgers not to bulge in the center.)


Cover patties and let marinade in refrigerator for at least one hour.


Grill over high heat to quickly sear outside of burger and seal in juices. Cook 3-4 minutes per side.


From the website infinetaste.com


Tuesday, September 17, 2019

Southwest chicken for Street tacos


Southwest Chicken 

Street Tacos

One of the best taco recipes out there! Chicken thighs are soaked in a bright well-seasoned marinade and grilled to perfection (you'll be fighting over those little charred crispy pieces). 

These chicken street tacos are so flavorful and so easy to make. I frequently serve these chicken tacos to guests and they always get compliments!!

Servings: 4
Prep Time15 minutes
Cook Time10 minutes
Total Time25 minutes

Ingredients

  • 1 1/2 lbs trimmed boneless skinless chicken thighs or breasts
  • 1/4 cup fresh lime juice, or apple cider vinegar
  • 1/4 cup olive oil
  • 3 cloves garlic, peeled and smashed, or 1 tsp garlic powder
  • 2 tsp ground cumin
  • 1 1/4 tsp chili powder
  • 1/4 cup chopped fresh cilantro
  • 1/2 tsp salt 
  • 1/4 tsp freshly ground black pepper

  • Orange juice or pineapple juice

For serving

  • 12 mini corn taco shells, warmed (double up if desired)
  • 1 large avocado,* cored and sliced
  • 1 small red or yellow onion, chopped
  • 3 Tbsp chopped cilantro
  • Lime wedges, for serving (optional)

Instructions

  1. Add chicken to a gallon size resealable bag. In a small bowl whisk together lime juice, olive oil, garlic, cumin chili powder, cilantro, salt and black pepper.


  2. Pour mixture over chicken in bag then seal bag while releasing an trapped air. Rub marinade over chicken. Transfer to refrigerator and allow to marinate at least 1 hour and up to 6 hours

  3. GRILL: Preheat a GRILL over medium-high heat (it should come to 425 - 450 degrees). Remove chicken from marinade and grill until chicken has cooked through , turning once halfway through grilling, about 5 - 6 minutes per side (thickest center should register 165 and thighs should be slightly charred)


  4. BAKE: You can BAKE the chicken instead of grilling. Bake at 425ºF for 30 minutes on a sheet pan (or until cooked through and crisp on the edges).

  5. Transfer to a plate, cover with foil and let rest 5 minutes

  6. Dice grilled chicken into cubes. Add orange juice or pineapple juice to the chicken to taste


  7. Sprinkle chicken over 1 or 2 tortillas per taco then add an avocado slice, diced chicken, onions and cilantro. 


  8. Serve warm, spritzing each taco with lime juice and drizzling with hot sauce.

Recipe Notes

  • *Try homemade guacamole for another delicious option.
  • Stick with chicken thighs for best results. They're more tender and juicier, they brown better and they have better flavor.
  • Recipe source: Cooking Classy
Nutrition Facts
Grilled Chicken Street Tacos
Amount Per Serving
Calories 463Calories from Fat 189
% Daily Value*
Fat 21g32%
Saturated Fat 3g19%
Cholesterol 161mg54%
Sodium 192mg8%
Potassium 800mg23%
Carbohydrates 32g11%
Fiber 6g25%
Sugar 2g2%
Protein 37g74%
Vitamin A 380IU8%
Vitamin C 12mg15%
Calcium 84mg8%
Iron 3mg17%
* Percent Daily Values are based on a 2000 calorie diet.
This awesome recipe is from CookingClassy.com


Saturday, September 7, 2019

Veggie Pepperoni Pasta Salad


3 cups dry rotini pasta, cooked
1 small zucchini, de-seeded and sliced
1 small yellow squash, de-seeded and sliced
1 med red sweet pepper, diced or cut into 2 inch strips
½ white or red Onion, finely diced then pressed with salt
1 can 15 oz diced tomatoes rinsed and drained, or halfed cherry tomatoes
1 tsp dried oregano, or fresh oregano chopped
3 oz sliced pepperoni, quartered (optional)
½ lb cheddar cheese cubed, or shredded parmesean
1 cup bottled balsamic vinaigrette salad dressing, or Italian dressing

DIRECTIONS:
Cook pasta, rinse with cold water.
In a large bowl combine all ingredients. Toss gently to coat. 
Cover and chill for 2-24 hours.

Saturday, July 27, 2019

Apricot Fruit Leather

How to Make Apricot Fruit Leather


4.89 from 17 votes

Prep Time: 30 minutes


Cook Time: 3 hours 30 minutes


Total Time: 4 hours

The kids go crazy for this apricot fruit leather. This needs only 2 ingredients and tastes way better than store-bought!

Author: Natasha of NatashasKitchen.com

Skill Level: Easy

Cost to Make: Varies

Servings: 3 large baking sheets of fruit leather

Ingredients

5 lbs ripe sweet apricots


1/2 cup granulated sugar or to taste


Instructions

How To Make Apricot Fruit Leather:

Rinse apricots, cut in half and discard pits. Place on a large baking sheet cut-side-up and bake at 400˚F for 15 min (it's ok to crowd the fruit in a smaller pan). Remove from oven and let cool until just warm enough to handle.


Transfer to blender or food processor in batches and process until a smooth puree.


Pour puree into a large mixing bowl. Add 1/2 cup sugar, or to taste and stir until sugar is incorporated.


How to Dry Fruit Leather with Sunshine (my favorite way):

Spread puree between 1/8" to 1/4" thick on a large parchment paper or plastic wrap covered baking sheet, extending the paper slightly past the rim. This recipe fills 3 large baking sheets. Set in the sunshine until no longer sticky when you poke the centers. It can fully dry out in 1 day if it's hot out or 2 days if warm and sunny (store indoors uncovered overnight).


How to Make Fruit Leather in the Oven:

Spread puree on a large cookie sheet lined with parchment paper and place baking sheets in a preheated oven at 200˚F for about 3 to 3 1/2 hours, depending on how thick you spread it. It's done when it no longer sticks to your fingers when you poke the center. Once at room temp, roll and store at room temperature in large ziploc or foodsaver bags.


Nutrition Disclosure


If you make this recipe, I’d love to see pics of your creations on Instagram, Facebook and Twitter! Hashtag them #natashaskitchen


It’s so sweet how much my kids LOVE this apricot fruit leather! I hope you try your hand at this fruit leather. It’s so easy and you can give the kiddos in your life a sweet surprise :).

From natashaskitchen.com

Wednesday, July 24, 2019

Easy Egg Bites

An easy high protein To Go Breakfast.
Great Weight Watchers recipe!
Makes 24 egg bites.

INGREDIENTS:
  12 dozen med eggs (0 WW points)
  1/4 cup diced onion  (0 WW points)
  1 cup cottage cheese 2%milk fat (3 WW points)
  1/2 c. evaporated milk  (3 WW points)
  1/2 tsp salt
  1/8 tsp pepper
  olive oil spray

Jazz it up with OPTIONAL ingredients:
  -chopped bell peppers and chopped spinach
  -sundried tomato and basil and chopped spinach
  -sliced pepperoncini

DIRECTIONS:
Grease 2 muffin tins with olive oil spray
Preheat oven 375 degrees F
Place in blender, except for optional ingredients
Blend for 30 seconds
Sprinkle OPTIONAL ingredients into the bottom of each muffin cup
Pour 1/4 cup egg mixture into each muffin cup.
Place a pan of water on the bottom rack of the oven to prevent browning.
Bake on top rack for 20 minutes.

Serve hot or Freeze for a quick To-Go meal

4 egg bites is 1 WW point
1 egg bite is 1/4 WW point

Wednesday, June 5, 2019

Banana muffins using a yellow cake mix


3 overripe bananas

3 eggs

1/2 cup vegetable oil or butter

1 (15 ounce) box yellow cake mix

There are literally only 4 ingredients in this recipe. It can’t get any easier than this.
This simple recipe is great for when you have overly ripe bananas that you need to use up before they go bad and you don’t want to make anything complicated. So make sure to add it to your list of overripe banana recipes! It’s fantastic for school lunches.
  1. Preheat oven to 350°F. Prep the baking pan and set aside
  2. Mix together the bananas, eggs, and oil then stir in the cake mix.
  3. Scoop the batter into the muffin pan and bake.
  4. Cool for 13-16 minutes and enjoy!
From cake mix to muffins just like that!
Www.beatbakeeat.com

Saturday, April 20, 2019

Indian Chicken Curry (Murgh Kari)

     INGREDIENTS:

2 pounds bone-in chicken thighs OR three 14.5oz cans garbanzo beans, drained

1/2 tsp salt

1/2 cup cooking oil

1 1/2 cups chopped onion

1 Tablespoon minced garlic

1-1/2 tsp minced fresh ginger root

1 Tablespoon curry powder

1 tsp ground cumin

1 tsp ground turmeric

1 tsp ground coriander

1 tsp cayenne pepper (optional)

1/2 cup water

1/4 cup butter

1 (15 ounce) can crushed tomatoes

1 cup plain while milk yogurt

1/2 cup heavy whipping cream


. . . . . 

     TOPPINGS

1 tablespoon chopped fresh cilantro

1 teaspoon salt

1 teaspoon garam masala

1 tsp fresh lemon juice (or use lemon pepper, this option increases the saltiness of the curry) 


Directions
Prep
20 min

Cook
40 min
Ready In 1 hour

Sprinkle the chicken breasts with 1/2 teaspoon salt.

Heat the oil in a large skillet over high heat; partially cook the chicken in the hot oil in batches until completely browned. Transfer the browned chicken thighs to a plate and set aside.

Reduce the heat under the skillet to medium-high; add the onion, garlic, and ginger to the oil remaining in the skillet and cook and stir until the onion turns translucent, about 8 minutes. Stir the curry powder, cumin, turmeric, coriander, cayenne, and 1 tablespoon of water into the onion mixture; allow to heat together for about 1 minute while stirring. Mix the tomatoes, 1 tablespoon chopped cilantro, and 1 teaspoon salt into the mixture. 

Return the chicken breast to the skillet along with any juices on the plate. Pour 1/2 cup water into the mixture; bring to a boil, turning the chicken to coat with the sauce. Sprinkle the garam masala and 1 tablespoon cilantro over the chicken.

Cover the skillet and simmer until the chicken breasts are no longer pink in the center and the juices run clear, about 20 minutes. An instant-read thermometer inserted into the center should read at least 165 degrees F (74 degrees C). 
Stir in the yogurt and heavy cream after the simmering.
Serve on top of white rice, brown rice, or diced baked potatoes.
 Sprinkle with lemon juice, chopped cilantro, and sour cream


Nutrition Facts
Per Serving: 427 calories; 24.3 g fat;14.7 g carbohydrates; 38.1 g protein;95 mg cholesterol; 1370 mg sodium.

Sunday, April 7, 2019

Party Fruit Dip !

24oz   cream cheese, softened to room tempurature
16oz   plain whole milk yogurt, brought to room tempurature
1/2 cup  granulated sugar (or monk fruit sweetener)
1/2 tsp vanilla extract
1 tsp   Raspberry or Strawberry jello powder, for color


PLACE cream cheese in large bowl, or a food processor with wire whisk attachment.  BEAT well for 1-2 minutes

ADD sugar and Jello powder.  
BEAT until there are no lumps.
ADD vanilla yogurt.  
BEAT for 3-5 minutes until perfectly smooth

Place in your favorite serving dishes. Cover.
REFRIGERATE for 1-2 hours.

SERVE with sliced apples , bananas, pineapple, strawberries, cantaloupe, honeydew, etc


Note 1: this is a fun treat for baby showers.  Use Blue raspberry Jello for BOY baby showers

Note 2: when i make this recipe, i bring the cream cheese and yogurt to room temperature by putting it on the countertop overnight. It doesn't alter the finished product