Chop potatoes into 1-inch cubes, place in a bowl of water. Use a strainer to drain the water. This step is to remove some of the potato starch, the waste water will be pink.
Place potatoes on a dry dish towel. Pat dry with a second dish towel. Let dry for 30-60 minutes
Meanwhile, cut carrots down the middle hot dog style, the chop into 1-inch half circles.
Toss carrots with oil and salt. Bake at 400 degrees in a deep-dish pan in the oven, or sauté on stovetop until tender.
Once potatoes are dry, toss with oil and salt. Bake in a deep dish pan in the oven at 400 degrees. Set a timer for 10 minutes; stir potatoes with a flat spatula at the 10 minute timer. Bake for an additional 30-40 minutes, or until golden brown.
Sauté turkey sausage on stovetop.
Combine carrots, potatoes, and turkey sausage. Taste test. Add more salt if desired. Enjoy with BBQ sauce, fry sauce, or ketchup
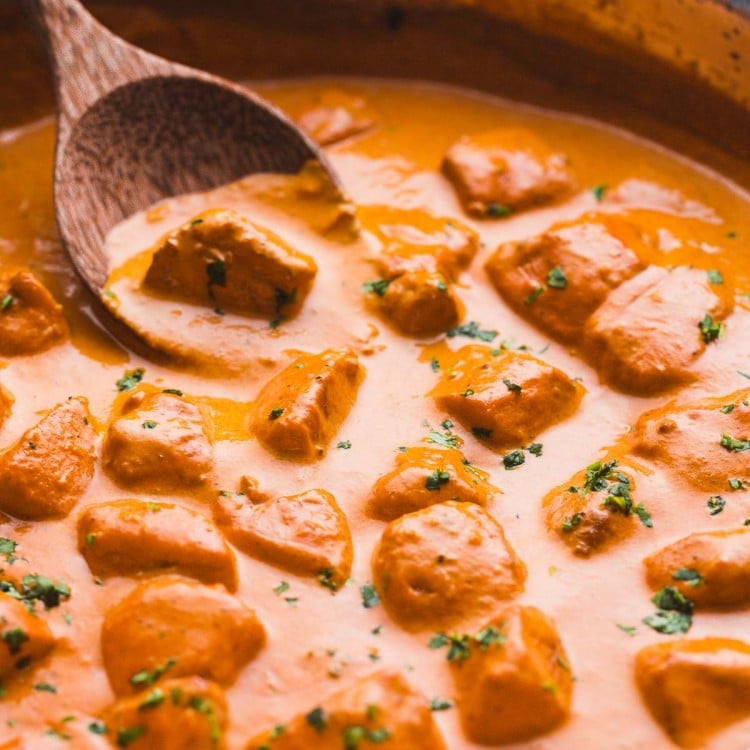
Make authentic-tasting butter chicken without any extra steps, and using very simple ingredients.
Whether you’re an Instant Pot junkie or some of your family members eat a plant-based diet, I’ve got you covered! Check out my Instant Pot butter chicken with so many 5-star reviews from my readers, and my vegan cauliflower butter “chicken” that tastes as amazing as the chicken version!
Can’t find garam masala in your local grocery store? No problem! I also included an easy garam masala recipe for you to make at home. If you prefer to buy it, this one is pretty good.
Excited to try this butter chicken recipe? Let’s dive deep into the recipe!
In my recipes, I always try to find substitutions for authentic ingredients that are difficult to find in the Western world. I also simplified the method, which doesn’t necessarily make the recipe so authentic, but it works, and it’s good. So you just need to trust me on this.
So for this butter chicken recipe, I made a shortcut version where you don’t need to marinate the chicken in yogurt, and wait until it’s marinated. It also makes browning the chicken much easier.
Complete list of ingredients and amounts can be found in the recipe card below.
Chicken – use skinless and boneless chicken breast or thighs for this recipe. Thighs contain more fat, so the chicken will be moister. But chicken breasts work great here too, so use whichever you have available. Cut into bite-size pieces, and remember that the pieces will shrink in size as the chicken cooks.
Oil, and butter – you will need oil to saute the chicken, if you use just butter, it might burn. So make sure to add oil. As for what kind of oil to use, you can use any oil with a high smoke point. I recommend canola, vegetable, corn, or sunflower. As for the butter, use unsalted butter to be able to control the salt later.
Garlic and ginger – any curry dream team! The secret to a silky smooth butter chicken is to crush the garlic, and grate the ginger. Do not mince them as you might end up with a little crunch.
Spices – this is where all the flavor is. Garam masala (if you would like to make it at home, I have a homemade garam masala recipe here), in addition to cumin, smoked paprika, turmeric, chili, and salt.
Tomato sauce – Use smooth tomato sauce, passata, or a can of plain tomatoes that are blended and sieved. Or if you have more fresh tomatoes than you know what to do with, just blend and sieve them.
Heavy cream – heavy or whipping cream to make the sauce super creamy and good.
Cilantro – Fresh cilantro, parsley, or mint leaves for serving.
How to Make Butter Chicken
In a frying pan, heat vegetable oil and melt 1 tablespoon of butter. Brown the diced chicken breast until golden (after you’re done with browning the chicken, you can deglaze the pan if needed with 2 tablespoons-1/4 cup of water or stock if needed). Move the chicken to one side, and melt the rest of the butter.
Add the garlic and ginger, and cook until fragrant (about 1 minute). Add all of the spices, and the salt, stir and cook for a minute then add the passata.
Give everything a mix, cover with a lid and simmer on medium heat for 5-10 minutes for the chicken to cook and the flavors to settle.
Carefully open the lid, and stir in the cream, and allow the sauce to reduce a little. Serve warm over rice with chopped parsley, mint, or cilantro.
As I mentioned before, this is NOT the authentic method to make butter chicken. I simplified the traditional method as much as possible to make it easier for you, without compromising on the taste.
But this recipe 100% works, and it’s SO good!
Is This Recipe Really Spicy?
My version of butter chicken is medium spicy, so if you’re feeding children I recommend that you leave out the chili powder.
What to Serve Butter Chicken With?
Basmati rice – probably the most traditional way and the most delicious. I love cooking basmati rice in the Instant Pot, and it turns out so perfect every single time!
Brown rice – to keep things healthier, make brown rice in the Instant Pot and serve it with this butter chicken.
Coconut rice – if you’re feeling a bit fancy and for an indulgent meal, the coconut rice pairs so well with the cauliflower butter curry.
Naan bread – to eat all of the sauce and not miss any drop (yes, it’s that good!).
And make this mushroom bhaji to serve on the side, it’s SO easy and good!
Success Tips
Passata, tomato sauce, fresh tomatoes that are blended, or a can of crushed tomatoes that are blended and sieved can be used in this recipe. So use any of these options, whichever you have available (I used plain passata).
You can make your own garam masala mix at home. I have the recipe on my website. Making your homemade seasonings at home is much cheaper, and healthier as store-bought seasonings usually contain added sugar. If you can’t make it at home, you can buy garam masala from Amazon.
Traditionally, a little bit of sugar is added to the sauce to make it sweeter. I personally don’t add any sugar to my butter chicken, and it tastes great. But feel free to add 1 teaspoon of granulated or brown sugar to the sauce.
You can substitute the whipping cream with full-fat canned coconut milk for a dairy-free version.
If you don’t have fresh ginger available, you can use half a teaspoon of ground ginger instead.
Storing Tips
Fridge: Store leftovers in the fridge in an airtight container for up to 5 days.
Reheat: Reheat in the microwave and make sure that you add a splash of water before reheating as otherwise, the sauce will be too thick.
Freezer: Freeze in a freezer-safe container for up to 3 months.
Recommended Tools to Make This Recipe
A large pot or pan. Make sure that you’re using the right size of pot or pan, as you’ll be cooking this whole dish in it.
Kitchen tongs. Makes browning and flipping the chicken so easy.
Microplane grater. I always use a grater for ginger in recipes like this.
Sharp knife. This is the knife that I use all the time, a sharp knife is so important and if you want to invest in a new knife then a high-quality chef knife is what I recommend. This one is also currently on sale and well worth the money.